
Friday, April 15, 2011
Making a move!
Obviously life has seriously gotten in the way of this blog. I haven't posted in almost 2 years. To quickly catch you up, I finished nursing school, Jesse got a new job, and we moved to San Diego. Because I have had so many life changes in the past year and half I've decided it would be appropriate to start a new blog. So on the off chance that anyone sees this post, my new blog is called Sunny Side Up in San Diego. Please stop by, get comfy and leave some comments!
Monday, October 26, 2009
Halloween Cupcakes

I know, I know! I made several promises in my last blog post for different recipes, but I made these last week and they were too cute to be pushed to the end of the line. As many of you know I am in nursing school and because of that I had to quit my full time job last year. But I still love to go back and visit all of my coworkers (especially since one of them happens to be BFF :)) Last week I promised said BFF that I would come have lunch one day since I was off of school. Then she reminded me that there was a birthday earlier that week and politely suggested that I make a special treat for her. Who am I turn down baking? After some secret super spying she reported that the birthday girl really liked chocolate cupcakes with white frosting, the almond flavored kind. Since I had lots of left over buttermilk from Jesse's birthday cake the week before I searched for a chocolate buttermilk cake recipe. The one I found turned out to be amazing and I will definitely make it again. As for the frosting I just went with a basic buttercream and added almond extract. The flavor pairing was perfect. Since it is also my favorite season of all, I colored the buttercream and added some candy corns to the top.

Chocolate Buttermilk Cupcakes with Almond Buttercream Icing
(Cake source: Good Housekeeping)
Ingredients
2 cups all-purpose flour
1 cup unsweetened cocoa
1 1/2 tsp baking soda
1/2 tsp Salt
1 1/2 cups buttermilk
2 tsp vanilla extract
1 3/4 cup granulated sugar
3/4 cup (1 1/2 sticks) butter, softened
3 large eggs
2-3 cups almond buttercream frosting
~50 Candy Corns
Directions
Preheat oven to 350 degrees F. Line 2 muffin tins with cupcake liners. (24 total)
In a medium bowl sift together flour, cocoa, baking soda, and 3/4 teaspoon salt. In 2-cup liquid measuring cup, mix buttermilk and vanilla; set aside.
In large bowl, with mixer on low speed, beat sugar and butter until blended. Increase speed to high; beat 3 minutes or until creamy, occasionally scraping bowl with rubber spatula. Reduce speed to low; add eggs, 1 at a time, beating well after each addition.
Beat in flour mixture alternately with buttermilk mixture just until blended, beginning and ending with flour mixture, scraping bowl occasionally.
Pour batter into prepared muffin tins. Bake 30 to 35 minutes or until toothpick inserted in center of cake comes out clean. Cool in pans on wire racks 10 minutes.
Using the 1M or 2D pastry tip, pipe the frosting on the top of the cupcakes. Place 1-3 (depending on style) candy corns on top of each cupcake.
Almond Buttercream
1/2 cup vegetable shortening
1/2 cup softened butter
1 lb confectioners sugar
1 "cap" full almond extract (~1/2 tsp)
1/2 tsp vanilla extract
2-3 tbsp buttermilk
4-5 drops yellow food coloring
4-5 drops red food coloring
Beat the shortening and butter together in a mixing bowl for 2-3 minutes or until well combined. Slowly add the confectioners sugar, about 1/2 cup at a time. Half way through adding the confectioners sugar add the buttermilk.
Continue to beat until the frosting is a smooth spreadable texture, but not too soft. If it appears to stiff or dry add a little more buttermilk. If it appears too wet or runny add more confectioners sugar.
When the frosting is the texture you want add the food coloring.

Monday, October 5, 2009
Pumpkin Blondies
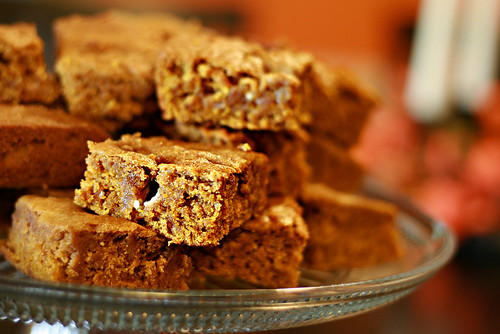
This post has moved to the Sunny Side :) Click the link to find the recipe, I promise it's worth it!
Wednesday, September 30, 2009
Individual Cheesecake Brownies

Eek! I am so far behind in blogging. Can you believe that this recipe is actually from a party I went to on Labor Day weekend? I have several other recipes and pictures that are just waiting for me to take the time to write the post and post them. I guess that's what happens when you're in nursing school, a new dance season starts and you're still working! Anyhow, you can look forward to pumpkin blondies, three bean five alarm chili, a simple but delicious grilled cheese, pork chops and pumpkin cream cheese muffins in the next week or so.
Now for today's recipe. I love the idea of individual desserts because they are not only cute but also handy. Like a nice little compact brownie to go. For that reason, they are a perfect addition to any outdoor cook out. For this I didn't use a brand new recipe but instead I put a new twist on my old favorite. I did mostly plain cheesecake brownies with chocolate chips but I also did a few peanut butter cheesecake brownies using this filling recipe. They both were a great hit at the party!

Individual Cheesecake Brownies
Supplies
1 batch of brownie batter with 1 cup of chocolate chips added
1 batch of cheesecake filling (below)
2 muffin tins (the 12 muffin size)
toothpicks
Directions
Start by greasing all of the muffin wells. Next fill each well half way with brownie batter. Then add 2-3 tbsp of cheesecake filling to each. Top that with a dollop of brownie batter. Next swirl the brownie batter and cheesecake filling with a toothpick. *My batter was pretty thick so it took a little coaxing on my part to get a nice pretty swirl* Bake at 350 for 25-30 minutes or until a toothpick inserted in the middle comes out clean.
Cheesecake filling
1 block (8 oz) cream cheese*, at room temperature
1 tsp vanilla extract
1 egg
1/4 cup sugar
Use a handmixer to thoroughly blend ingredients. Store in fridge until ready to use.
Tuesday, September 15, 2009
So You Grew a Garden... Veggie Round-Up!

It's time for the round-up! I have to admit I was drooling every time I opened a new email submission. These are all really great and wonderfully colorful recipes! As much as I love fall, I am already looking forward to next summers garden so I can personally try all of these fantastic recipes! For my own submission, I used a new recipe for a great dip, it is down at the bottom!
Thanks again to all of my participants. Your recipes are a great inspiration to all gardeners that have run out of ideas for their harvest, as well as non-gardeners just looking for a new way to cook up some veggies!
First up we have Amy from the French Kitchen. She submitted this drool worthy recipe for a cheesy vegetable medley. I love how simple AND delicious this looks. Amy says, "This is such an easy but flavorful dish. I used vegetables from my grandfather's garden and the recipe comes from my mother-in-law. It's simply sauteed chopped veggies and melted cheese. Need I say more?" Nope, no need to say more. You had me at cheese.

Next is Jessica from the Novice Chef. Her sauteed eggplant sounds absolutely amazing. I was excited to see an eggplant submission because I have never actually cooked eggplant before. Now I have a great recipe to start with! Jessica says, "This recipe is one of my favorite ways to cook eggplant. The lemon really gives it something special!"

Molly, from the Rookie Chef, submitted this super colorful kabob. Kabobs are a really fantastic way to use vegetables and make a great presentation on a plate, as you can see from her picture. Molly says, "Rainbow Kabobs are a great way to incorporate six different vegetables into your diet. The wider variety of color, the wider variety of nutrients!"

The next submission comes from Yudith at Blissfully Delicious. This tomato tart looks and sounds so delicious! It makes me extra sad that the darn deer ate my tomato plants! Yudith says, "I love how simple this recipe was. It really showcases these homegrown tomatoes that my mom planted this summer!"

Cate, from Cate's World Kitchen, submitted another great eggplant recipe! Again, another reason for me to pick up an eggplant the next time I'm at the grocery store! Cate says, "The smokiness from the eggplant is what makes this salad, but the citrus and all the fresh vegetables keep it light and perfect for summer."

The Beantown Baker, Jen, submitted this incredible looking potato salad. I love how unique this recipe is, it's a great play on an old favorite. Jen says, "I love heading to my farmers market and just grabbing whatever looks fresh to throw something together for dinner that night. I came home one week with snap peas, cucumbers, and tomatoes which turned into this delicious potato salad."

Janet, from Cooking in Cucamonga, sent me 3 great links from her blog. Spinach and ricotta stuff portabellas, chock full of veggies pasta sauce, and black bean and corn salsa. I am such a sucker for any kind of salsa and hers looks really delicious, so I chose it for the round up. Janet says, "The name 'salsa' is misleading in this recipe. This is not really a salsa, or even a garnish; It is more of a side dish. It's a great summery addition to a bbq or burgers, and can be made even better by using fresh corn."

I almost forgot this next submission! I apologize, Amy! Amy, from Skinny Food by Amy submitted a very unique jalapeno pepper jelly. This jelly looks like so much fun to make, and as she points out in her post, what a great Christmas gift! Amy says, "I've never canned anything before, but I was really excited to try to make this jalapeno jelly. It is going to make great gifts for my family and friends this holiday season!"

Finally, my own submission for the round-up. I have just a few straggling Serrano peppers from my garden and I was looking for a way to use them. When I decided to have a few fellow nursing students over for a study session, I wanted to make a good dip and this recipe seemed like the perfect way to meet both of those needs. This dip certainly did not disappoint me or my guests. It's flavorful, spicy and creamy all at the same time. This will be a must for football Sundays which have FINALLY begun! Also, I used the leftovers as a spread on a burger and it was *amazing*. Give this great dip recipe a try!

Jalapeno Popper Dip
(Adapted from The Rookie Chef)
Ingredients
1 block of neufatchel (reduced fat cream cheese), softened
1/2 cup light mayonnaise
4-5 serrano peppers, seeded, roasted and finely chopped
1/4 cups jarred jalapeno rings, finely chopped
1/2 tsp garlic powder
salt and pepper to taste
1/2 - 3/4 cup monterey jack shredded cheese
Combine ingredients in a bowl. Transfer the dip to a nice oven proof serving dish. Bake at 375 for 15-20 minutes, or until the cheese starts to turn golden brown on the edges and is bubbly in the middle. You can also put the ingredients in a crockpot, if you do that I would recommend doubling the recipe.

Monday, September 7, 2009
So You Grew a Garden... Event!

Summer is coming to a close and that means an end to my vegetable garden. Other than the sad loss of our 14 tomato plants (darn deer!) we had a pretty good run this summer. But this post is not about my garden, I want to see the fruits of YOUR labor! I am very excited to announce the Orange Kitchen's first blogging event! A Veggie Round-Up! What I am looking for are recipes that really highlight garden vegetables. If you would like to participate create a blog post (old posts are OK) and email me your entry! Just check out the guidelines below.

Here are a few simple rules:
- The recipe MUST highlight a vegetable. It's great if you grew the vegetable yourself, but don't worry if your veggies are from a farmers market or grocery store.
- All entries should be submitted via email to orangekitchencooking@gmail.com.
- The email should include: your name, blog name and URL, permanent link to your entry post, the picture you wish to be used in the round-up, and a short (sentence or 2) description of the recipe or your experience making it.
- If you do not have a blog feel free to email your name, a photo of the food, a link to where you found the recipe that you used and a short description of the recipe/your experience.
- Entries should be submitted by midnight on Saturday, September 12th **EDIT I have decided to make the deadline midnight on Sunday, September 13th! Hopefully the extra weekend day will be helpful to some people! The round up will be posted by Monday, September 14th.
- Feel free to use the round-up graphic I created and link back to my site!
Friday, September 4, 2009
Ribs

This post has moved to the Sunny Side :) Click the link to find the recipe, I promise it's worth it!
Subscribe to:
Posts (Atom)